Monday, November 4, 2024

Rosette Cookies

Rosette cookies are a cookie made from very light batter that is deep fried. A rosette iron is used to make them. They are of Norwegian origin, and are made as a Christmas treat.  Rosette irons come in many shapes and sizes. The more expensive ones are made from cast iron while the less expensive ones are made from cast aluminum. Mine is aluminum and works very well.


The most important thing with making rosettes is the temperature of the oil. It must be kept between 350-375 degrees. Any cooler and the cookie won't cook quickly and evenly as it should, any hotter and the cookie may burn or stick to the iron.  You can use an electric fryer with a thermostat, but I use a cast iron skillet and a thermometer.  The picture on the right shows my setup with a cast iron skillet filled half way with vegetable oil and a probe thermometer hanging halfway into the oil to keep tabs on the temperature.  If you do it this way, keep your eye on the thermometer. You'll probably have to make slight heat adjustments to keep the temperature within the 365-375 degree range.

Rosette Cookie Batter
  • 2 eggs
  • 1 TBSP sugar
  • small pinch of salt
  • 1 cup flour
  • 1 cup milk
  • 1 tsp vanilla
Beat together eggs, salt and sugar. Add rest of ingredients and beat until smooth. 

Pour oil into pan or fryer, making sure to fill no more than half way to allow for expansion of hot oil when food is placed into it. Make sure you have the lid for the pan or fryer close by.  There is always a risk of oil catching on fire (although it is minimal if you keep it below 375 degrees) and the best way to douse an oil fire is by placing a lid on it.  Safety first!


Make sure rosette iron is clean and dry. After oil comes to temperature. put iron in oil for a minute or two so that it heats up.


Shake off excess oil, and dip iron into batter, but not all the way to the top. Leave a quarter inch or so from the top of the iron, otherwise the batter will cook over the iron and the cookie will be difficult to remove.


Place batter-coated iron into hot oil and cook for about 30 seconds or until brown.  


The cookie may slip off the iron when still in the oil. Just remove it with a metal turner.  If the cookie doesn't come off the iron in the hot oil, give it a gentle shake and it usually will fall off, or gently remove it by putting a metal turner edge alongside one of the edges of the cookie. Place it on a wire rack with paper towels underneath to drain.


Continue this procedure until all the batter is used up.  It may take a few tries to get a perfect cookie, but with practice you'll be cranking them out in good order. Just remember to keep that temperature between 365-375 degrees and you'll be rewarded with some of the lightest, crispiest cookies you've ever eaten! Once the cookies are done, dust them with powdered sugar and enjoy.

Sunday, April 25, 2021

Apple Crisp

For those who like apple pie (and who doesn't) here's a recipe that makes a very good apple crisp without the hassle of pie crust.

I use a handy dandy piece of equipment that peels, cores and slices the apple all with a turn of the handle. It does a pretty good job, unless the apples are too much out of round. Then it leaves some of the peel. But all in all, it is a lot easier and faster than peeling, coring and slicing by hand:


Apple Crisp
This recipe makes enough to fill a 12 x 8 baking pan.
  • 1 1/4 cup sugar
  • 2 tsp lemon juice
  • 1/4 cup water
  • 1 tsp cinnamon
  • 3/4 cup white flour
  • 8 TBS butter
  • 6 large apples
Place 1/2 cup of the sugar, water, lemon juice and cinnamon in bottom of the pan. Mix ingredients well. Add sliced apples to mixture.  Blend in the rest of the sugar (3/4 cup) with the flour and butter. Blend until mixture becomes crumbly.  Put over apples and pat down until smooth.  Bake at 375 degrees for 45 minutes or until apples are soft and crust is brown and crispy.

Thursday, April 22, 2021

Pizza Stones And How To Use Them

The home cook that wants to create a great homemade pizza should take a cue from professional pizza chefs. Half of the battle is in the crust. Whether thick or thin, the crust can make or break a pizza. No matter what the toppings are, if the crust is not done all the way through, or done too much to the point of being burnt, the pizza is ruined.

The home cook can come real close to the quality of cooked pizza crust of professional pizza chefs by using a pizza stone. With a pizza stone, a home oven can approximate the heat and cooking method of a commercial oven. A pizza stone increases the temperature and amount of heat that is directly applied to the pizza, so that it not only cooks on the top, but from the bottom also. As a good pizza stone is unglazed, it also wicks the moisture from the crust, which helps to ensure the crust is completely done.

To cook pizza on a stone, you of course need a stone and a paddle, or peel. The peel is made of wood or metal, and transfers the raw pizza directly onto the hot stone, and also removes it when done. But first, the stone.

There are many pizza stones available commercially. Make sure that the stone you get is not glazed. These stones can be rather expensive, but with care a pizza stone can last for a long time. Some have said that you can use regular unglazed terracotta tiles, which are not only cheaper but you can make the cooking are bigger or small by adding or subtracting tiles. I would advise using caution when using unglazed terracotta tiles that were manufactured for other uses besides cooking on. If you are positive that the tiles have no additives that could affect the food being cooked, then give them a try if you want. Otherwise, the money spent on a commercial pizza stone is money well spent.

Always place your stone in the oven before you turn it on. Placing a cold stone in a hot oven is inviting disaster, for the stone could break. Heat the stone for at least 30 minutes; an hour would be even better. For pizza, most times the temperature to set your oven at is 500-550. This allows the pizza to cook rapidly, another secret of professional pizza chefs.

Of course, after being in a 500-degree oven for an hour, the stone will be HOT! That's where the peel comes in. Liberally sprinkle the peel with corn meal, place your dough onto it and build your pizza. When ready to cook, CAREFULLY slide your pizza from the peel to the stone. The corn meal helps the pizza slide onto the stone.

After use and the stone has cooled, anything stuck to the stone can be scraped off with a plastic spatula or other utensil. There's really no need to ever wash the stone, but if you must, rinse it off with warm water only. Don't use detergents because the stone is porous and can absorb it and transfer tastes to the pizza. The stone will turn a dark brown color with use, but this is just the sign of a well-used, seasoned stone and will make it cook even better.

With a little experience, a pizza stone will not only bake a great pizza, but also bread, calzone, focaccia, stromboli, practically anything. With a little care and proper use, your pizza stone will last a long time, develop a patina and get better with age!
Pizza Stones

Wednesday, March 19, 2014

Baked Pasta Casserole

A hearty pasta casserole that is made with three different types of cheese.  Ricotta cheese is made from the whey that is left over from making other types of cheeses. Ricotta is similar to cottage cheese but is drier,  finer in texture and has a slightly sweet taste.

  • 8 ounces ziti, penne, or macaroni
  • 1 cup low fat Ricotta cheese
  • 1 large egg slightly beaten
  • 3/4 cup grated Parmesan cheese
  • 1 cup shredded Mozzarella cheese
  • 1 teaspoon garlic powder
  • 1 teaspoon celery salt
  • 1 tablespoon parsley flakes
  • 1/2 jar spaghetti or tomato sauce (13 ounces)
  • salt and pepper
Preheat oven to 450 degrees.
Bring a pot of water to the boil and cook pasta as directed on the package. Drain and set aside.
Place Ricotta, 1/4 cup Parmesan, 1/2 cup Mozzarella, egg, garlic powder, parsley flakes, celery salt and salt and pepper in a bowl and mix well.
Spread half of the tomato sauce in the bottom of a 2-quart oven proof casserole. Add cooked pasta, cover with the Ricotta mixture, then the rest of the tomato sauce. Add remaining Parmesan and Mozzarella cheese on the top. Put casserole on a rimmed baking sheet and bake until browned and bubbling, 20 to 25 minutes. 

Cooked hamburger or sausage could be added to this recipe to make a main course dish.  

Friday, September 6, 2013

Pulled Pork Pizza

As a rule I don't care for pizza that is too far from the traditional Italian style, but this pulled pork pizza is an exception.

Barbecued Pork
3 lbs. pork roast
2 cans of beer
barbecue sauce of choice

I usually use a pork loin roast, but any kind of pork roast will work. I've also used boneless country style pork ribs. The roast can be larger than 3 pounds, use what's on sale or available. Put the roast in a crock pot and put enough beer into it to cover. Cook on low for 7-8 hours or high for 4-5 hours. When done, remove roast and allow to rest until cool enough to handle. Using two forks, shred the pork. Put pulled pork in a large bowl and add your favorite barbecue sauce and mix well.  Reserve some of the barbecue sauce for later.

Pizza Crust
Use a prepared crust, a crust mix or use this recipe for home made pizza dough. Put dough in round pizza pan. If using raw dough, pre-bake for 10 minutes at 425.

Take remaining barbecue sauce and with a basting brush paint a thin layer of sauce on the dough. Sprinkle sauce layer with a little garlic powder and pepper. Add pulled pork in an even, thin layer. Sprinkle top with chopped red onion and drizzle a little barbecue sauce on top. Add a mixture of cheddar and monterey jack cheese evenly over all. Bake in a 425 degree oven for 10-15 minutes, or until cheese is melted and bubbly.

Friday, June 28, 2013

Peanut Butter Cake

Peanuts are thought to have originated in South America, known as early as 950 B.C.E. The Inca Indians of South America made a paste out of peanuts, thus the origins of peanut butter go back a long time. 

The following recipe is a cake made from peanut butter and other ingredients, and is topped with a peanut butter and honey frosting.  Reference to the recipe was given to me on the internet. I have no idea who devised the recipe, but it sure is a keeper! 

Peanut Butter Cake
  • 2 1/4 cups all purpose flour
  • 2 cups light brown sugar, packed
  • 1 cup creamy peanut butter
  • 1/2 cup room-temperature butter
  • 1 teaspoon baking powder
  • 1/2 teaspoon baking soda
  • 1 1/4 cups milk
  • 2 teaspoon vanilla extract
  • 3 eggs
Peanut Butter - Honey Frosting
  • 1/2 cup peanut butter
  • 2 Tablespoons honey
  • 1 teaspoon vanilla extract
  • 2 cups powdered sugar
  • 5 Tablespoons milk
  • 1 cup mini-chocolate chips
Preheat oven to 350 degrees. Grease and flour a 10 x 15 cake pan. In a large bowl, slowly mix first four
ingredients with electric mixer until crumbly. Add the rest of the ingredients, blend at slow speed until mixed well, then beat at medium speed for three minutes. 

Pour into pan and bake for 35-40 minutes or until toothpick inserted in the center of the cake comes out clean. Let cake cool in the pan for ten minutes and make frosting.

Warm peanut butter and honey in the microwave for 20-30 seconds to make it easy to stir, add the rest of the frosting ingredients with electric mixer until smooth. 

After cake has sat for ten minutes, spread the frosting on the warm cake and sprinkle with the mini-chocolate chips.  


Wednesday, January 9, 2013

Hot Sauce - Store Bought And Home Made

I would much rather use the commercial hot sauces that I like instead of making my own.  Not that making basic hot sauce is difficult, but there is a certain amount of experimentation needed to make a sauce with just the right blend of heat and flavor. A basic hot sauce can be made with just three ingredients:

2 cups plain white distilled vinegar
1 1/2 lbs seeded jalapeno chilis 
2 teaspoons salt 

Simmer all ingredients for at least 5 minutes, then puree mixture in a blender. Put mixture in a glass jar with a tight fitting lid and put in a dark place to age for at least three months. Check on the jar once a week to make sure too much pressure isn't building in it. The sauce is actually fermenting to a certain extent, so removing the lid to let the fermentation gases out might be a good idea. Be careful though. The gases will contain capsaicin,  the substance that give hot peppers their heat. Getting a whiff of the fumes could be quite uncomfortable.

There are scads of other recipes out there that add tomatoes, spices, and god-knows-what to the basic recipe for the more adventurous. One of the problems with making hot sauce that is consistent in heat and flavor is that in any given season the heat of the peppers can vary significantly. Very hot, dry weather can make peppers hotter than seasons that are cooler. The variety of peppers used also can make a big difference. Cooking that many hot peppers and vinegar in the house can also really stink up the place and release capsaicin in the air, so it's best to do it outside. Cutting up and seeding hot peppers, even the milder varieties, can make your hands feel like their on fire, so I'd wear rubber gloves. 

So for anyone that wants to make their own, I say go for it. For me, I've found two commercial hot sauces that I use on a regular basis. The first one is a versatile sauce that was the original hot sauce used for Buffalo Hot Wings; Franks Original Red Hot sauce. This sauce has been around since 1896. It uses cayenne peppers and is just right for my palate. The original Buffalo Hot Wings are very easy to make:

Chicken wings
1 tablespoon vinegar
pinch of garlic salt
pinch of celery seed
Franks Original Red Hot Sauce

Deep fry wings until done and crispy. Drain wings. In a cast iron skillet, melt a stick of butter and add vinegar, celery seed and garlic salt. Put wings in butter and coat them with the butter, let cook for a few minutes. Remove wings from the skillet and put them in a large bowl. Add hot sauce, toss wings until evenly coated. Swerve with blue cheese dressing with carrot and celery sticks.  

When I want more heat, or I'm going to cook with hot sauce, I use Sriracha sauce, an oriental sauce. If you want more heat to your Buffalo Wings, this is a good sauce to substitute with. I like to use this sauce for stir fries.  The longer this sauce is heated, the more heat it will lose, so I add it towards the end of the cooking process. It gives a great flavor to stir fried chicken or shrimp.

There are more hot sauces out there than you can shake a stick at. Some are basic, some are complex. Some are too damned hot for my taste.  If you like hot and spicy, explore Chinese, Mexican, Indian and many other ethnic foods and you'll find hot dishes.

Home Made Macaroni And Cheese

There's nothing any more satisfying than a home made macaroni and cheese casserole. It's not a difficult dish to make at all, and it can be made ahead of time and put into the oven about 30 minutes before mealtime. This recipe has a little cream along with the milk to add some richness. It definitely is not a low calorie - low fat food,  but it's great for a once in a while splurge.

Macaroni and Cheese

  • 3 cups cooked shell macaroni
  • 2 tablespoons flour
  • 2 tablespoons butter
  • 3/4 cup milk
  • 1/4 cup cream
  • 3 cups sharp cheddar cheese
  • salt to taste

Set oven to 350 degrees and preheat. Cook the shell macaroni, drain and set aside. Melt the butter in a large saucepan over medium heat, add flour and whisk together. Let cook for a minute or two until mixture begins to bubble slightly. Do not cook over high heat as this will burn the butter and darken the sauce. Add the milk and cream, whisk until the mixture becomes thick. Do not boil. When mixture is thick, add 2 1/2 cups of the cheddar cheese and stir until cheese melts.  Add macaroni shells and gently stir until shells are covered well with the cheese.  Grease a casserole with butter or oil and put shell/cheese mixture into it.  Dot the top with butter and add the remainder of the cheese. Put into oven and bake for 25-30 minutes.  Remove from oven when cheese is just starting to brown and is bubbly. sprinkle with parsley flakes and serve.

Thursday, September 13, 2012

Baby Artichoke And Chicken Stir Fry

Unlike regular size artichokes,  baby artichokes can be eaten whole with a little prep work. Their flavor is mild, and they make a perfect compliment to chicken in a stir fry.

  • 12-16 baby artichokes, cleaned and cut into quarters
  • 1 chicken breast, cut into small cubes
  • 2 carrots thinly sliced
  • 3 green onions chopped
  • 1/2 lb. fresh mushrooms sliced
  • 1 can baby corn
  • 1 tablespoon sherry
  • 1 tablespoon corn starch
  • 3 tablespoons soy sauce
  • 1/2 cup water
  • oil for frying (peanut or olive)
Preparation of ingredients -  Place artichokes in a colander and rinse thoroughly under cold water. Remove the dark green outer leaves of the artichoke until the leaves become pale green . Cut off the stem and the top of the artichoke. Cut the artichoke into quarters and put in a bowl with acidulated water to prevent them turning brown. Acidulated water is water that lemon juice or vinegar has been added to. Below is a picture comparing a whole baby artichoke with a correctly prepped one. 


Slice up the carrots, green onions, and mushrooms and set aside. Mix the corn starch and soy sauce with the water and set aside. Cut up chicken breast into small cubes.

Cooking directions -  Add 2 tablespoons of oil to a hot wok. Wait until oil is hot, put in chicken and stir-fry for a minute. Add sherry and continue stir frying until chicken is almost cooked through and begins to brown. Remove chicken, add a little more oil and reheat the wok. Thoroughly rinse and drain the artichokes, pat dry and add to hot wok. Stir fry for two minutes, add the rest of the vegetables and cook for 2-3 minutes. Add the cooked chicken, and add the corn starch mixture. As soon as the wok returns to temperature the corn starch will thicken. If sauce is too thick, add water a teaspoonful at a time until desired consistency is reached.  Serve over rice or noodles, add a few chunks of fresh honeydew and cantaloupe for a complete meal.


Friday, May 11, 2012

Pork and Jalapeno Frittata

A frittata is an open faced omelet with other ingredients added to it. The recipe for my Pork and Jalapeno frittata can be used as an example, as most anything can be used in a frittata. It's an excellent way to use up leftovers.


  • 6 oz. raw pork, cut into cubes
  • 1 small onion, chopped fine
  • 1/2 ripe red pepper, cut into thin strips
  • 1 small jalapeno pepper cut into rings
  • 1 small clove garlic, minced
  • salt and pepper 
  • 3 eggs

I used raw pork in this frittata, so I used a little bit different method to cook it.

Put a few tablespoons of olive oil in a medium sized skillet (10-11 inches in diameter). Let oil heat thoroughly. Add pork, onions, red peppers, garlic and jalapeno, salt and pepper and fry until pork is done. Beat up the eggs in a bowl, slowly pour them over the mixture. Shake the pan to make sure the eggs spread evenly. Reduce the heat to medium and put on a lid to help the center of the frittata set, or you can put the pan in the oven (350 degrees) for a few minutes.  When the center is set and the frittata is golden brown on the bottom, turn it out onto a plate and enjoy!

A frittata can be made out of most anything you've got left over too. If the meat you're using is already cooked, you can add everything to the eggs before putting into the skillet, or add the eggs separately. Experiment with different ingredients and cooking methods. There's really no right or wrong way to do it, as long as the eggs get cooked and it tastes good!

Monday, January 30, 2012

Yogurt, Walnut and Chocolate Chip Cookies

Here's a great recipe that uses yogurt and no eggs to make some of the best chocolate chip cookies I've ever tasted.


  • 1/2 cup white sugar
  • 1/2 cup packed brown sugar
  • 1/4 cup shortening
  • 1/4 cup butter
  • 1/2 cup plain nonfat yogurt
  • 2 teaspoons vanilla extract
  • pinch of salt
  • 1/2 teaspoon baking soda
  • 1 3/4 cups all-purpose flour
  • 2 cups semi sweet chocolate chips
  • 2 ounces chopped walnuts
Preheat oven to 375 degrees. Cream together sugars, shortening and butter until thoroughly combined. Stir in yogurt and vanilla. In a separate bowl combine salt, flour and baking soda. Stir into creamed mixture until thoroughly combined, mix in chocolate chips and walnuts. Drop by rounded spoonfuls onto greased cookie sheets and bake for 8-10 minutes or until edges are lightly browned.  allow to cool for a few minutes on cookie sheet after taking out of oven, remove cookies to a wire rack to cool. Makes about 36 cookies.

Saturday, December 17, 2011

Tea Brined Chicken

First of all, hats off to Lacy and her blog New York City Eats where I first saw this recipe. She's got an impressive blog you need to visit with tons of great recipes.

I've seen chefs on Food Network brining turkey for Thanksgiving but never tried it. People who have, swear by the method as it makes the turkey more flavorful and juicy. I saw this recipe at the above mentioned blog and thought I'd give it a try for myself. Trying it with a chicken is easier than with a big turkey anyway. After making a few changes to the recipe, I found that brining the chicken with tea did make it very juicy and flavorful! So give it a try, either version of the recipe, and I'm sure you'll agree.

Original brine recipe
3 Twinings Lapsang Souchong tea bags
1 quart + 1 cup water
1/3 cup + 2 tablespoons kosher salt
1/4 cup + 1 teaspoon dark brown sugar
(for brining 3-4lb chicken)

My alternative recipe
3 Twinings African Rooibos Red Tea bags
1 1/2 quarts water
1/2 cup pickling salt
1/3 cup brown sugar
(I was brining a 5 pound chicken)

So why the changes? A bigger chicken for one thing, plus I couldn't find the Lapsang Souchong tea locally. I picked the African Red tea just to be different, and I didn't realize until I got home that it is an herbal tea. But sometimes you just have to run with what you've got. I used pickling salt instead of kosher salt because it's what I had. Like I said, run with what you've got...

Whichever recipe you use, bring the water to a boil. Take off  the heat and put in the tea bags. Let steep for 20 minutes, then add salt and sugar. Let mixture cool, then put chicken in a gallon zip-seal bag and pour brine into it. Seal bag, put in a large bowl (just in case it leaks) and refrigerate over night.  Next day, remove chicken from brine, place in a roasting pan and roast in a 375 degree oven until internal temperature reaches 165 degrees.

The chicken comes out of the oven a reddish-brown color and the skin is delicious. I didn't put anything on the chicken when I roasted it and it needed no salt at the table. After it rested for 15 minutes, it was very tasty and juicy. I'll definitely be doing this again using a different kind of tea to see how it affects the flavor.

Wednesday, October 5, 2011

Tuna And Home Made Noodle Casserole

Not just any home made noodles, but noodles that have flax seed meal in them. Flax seed is high in soluble and insoluble fiber, anti-oxidants, and Omega-3 fatty acids. flax seed meal can be found in the supermarkets. If you get some, be sure to store it in an air tight container in the refrigerator. It should be used within two months after opening.

Home made noodles are pretty easy to make, it just takes a little extra time to do it.


Noodles
  • 2 3/4 cup all purpose white flour
  • 1/4 cup flax seed meal
  • 4 eggs
  • 2 TBSP olive oil
  • 2 TBSP cold water
  • 1/2 tsp salt
Put all ingredients into large bowl, mix and knead until loose dough forms. Gather all the dough and press it into a ball shape and knead for a few minutes. Again make the dough into a ball, wrap in plastic wrap and let rest for 30 minutes.  Separate dough into halves, roll each half into a large rectangle, making sure to keep dough well floured.  When dough is the thickness desired (remember that the noodles will get thicker when cooked) start at one end and roll up the dough like a jelly roll. With a sharp knife, cut thin noodles along the whole length of the roll of dough. Noodles will unroll after cutting if enough flour was used. Heat a large pot of water to boiling that has a little salt and olive oil added to it. Cook noodles until tender, about 5 minutes. Check noodles often while cooking as fresh noodles cook faster than dried ones.

Casserole 
  • 1 26-ounce can cream of mushroom condensed soup
  • 3 5-ounce cans tuna packed in water
  • 1 TBSP garlic powder
  • 1 regular sized package frozen peas
  • pepper to taste
  • 1/2 cup cheddar cheese
  • cracker crumbs
In a large sauce pan, combine soup and tuna with all the water it is packed in. Add garlic powder and cook over medium heat until hot.  Add frozen peas and cook a few minutes. Drain noodles thoroughly and put in large bowl. Add soup mixture and combine thoroughly to cover all the noodles. Stir in pepper to taste. Place noodle mixture in a 13 x 9 baking pan. Sprinkle cheese and cracker crumbs on top. Place in a preheated 375 degree oven for 30 minutes or until cheese and cracker crumbs are nicely browned.

Saturday, September 24, 2011

Thai Marinated Baked Salmon

A great recipe to add some flavor into baked salmon, and it's easy to do too!

  • Salmon fillets
  • 4 cloves garlic chopped
  • 3 green onions chopped
  • 1 inch piece fresh ginger chopped
  • small bunch cilantro
  • 1/4 cup soy sauce
  • 1/4 cup olive oil
  • 3 limes, 2 sliced, 1 cut into wedges
  • 3 TBS honey
  • 1 tsp sesame seed oil
  • 1/2 tsp black pepper
  • 3 or 4 dried red chilies (optional)
This marinade needs no salt due to the saltiness of the soy sauce. Put all ingredients except salmon in a bowl and mix thoroughly. Omit hot peppers if you do not want the dish to be hot. Put salmon fillets skin-side down in a roasting pan and pour marinade over. Cover with plastic wrap and allow to marinate in the refrigerator for at least two hours. The longer it marinates the stronger the flavor.

Preheat oven to 425 degrees. Remove fish from marinade and put in a clean roasting pan. Or bake fish in the marinade for a more intense flavor. Bake for 15 minutes, serve with lime wedges.

Tuesday, September 20, 2011

Bundt Cake Neapolitan

A cake that has three different flavors baked into it; vanilla, chocolate and strawberry. Just like Neapolitan ice cream!

  • 1 package (18.25 ounce) yellow cake mix
  • 1 cup water
  • 3 eggs
  • 1/4 cup vegetable oil
  • 1/4 cup chocolate syrup
  • 1 TBS cocoa powder
  • 1/4 cup strawberry jelly
  • 8 drops red food coloring
Add water, eggs, oil and cake mix in large bowl and mix on medium speed for two minutes. After batter is thoroughly mixed, divide it into three equal portions. Use oil spray in a bundt cake pan and pour one of the portions into it. Take one of the other portions and mix in the chocolate sauce and cocoa powder. Carefully spoon this mixture into the cake pan.  Take the last portion and mix in the strawberry jelly and food coloring. Carefully spoon this mixture into the pan. Do not swirl the mixtures together.

Put in a preheated 350 degree oven for 40-45 minutes or until a toothpick inserted into the center comes out clean. When done, let cool in the pan for 10 minutes. Use a thin rubber or plastic spatula (a metal one will scratch the cake pan) and gently run it down each fluted side of the pan to loosen the cake. Place a large bowl over the pan, turn it over and let sit until the cake comes out of the pan.  Dust with powdered sugar or drizzle glaze over the cake:

White Glaze:
  • 1 cup powdered sugar
  • 2 TBS milk
  • 2 TBS softened butter
  • 1/2 tsp vanilla
Combine all ingredients and stir until smooth. Pour over cake as desired.

Tuesday, September 13, 2011

Turkey Brat And Bean Stew

A great meal that is not hard to make and tastes really good. Serve with a salad and Italian bread for a complete meal.

  • 1 TBS olive oil
  • 1 pound turkey bratwurst out of casing
  • 1 medium onion, chopped
  • 2 garlic cloves, chopped
  • 1 rib celery, chopped
  • 2 carrots, sliced
  • 3 (15 1/2 ounce) cans Great Northern Beans
  • 1 (14 1/2 ounce) can fire roasted tomatoes
  • 1 tsp oregano
  • 1 tsp basil
  • 1/2 tsp thyme
  • pepper to taste
  • 2 cups washed and dried fresh spinach or chard
Heat a pot large enough for all the ingredients and add olive oil. When oil becomes hot, add sausage, carrots, onions, celery, garlic and onions. Cook over medium heat until sausage is done, stir to break up sausage into small pieces. Add the rest of the ingredients except spinach. simmer until mixture thickens, stir occasionally. After mixture thickens add spinach and when spinach is cooked through, serve.

Saturday, September 10, 2011

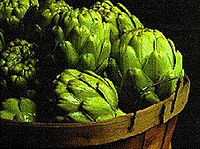
The Artichoke - An Edible Flower Bud

That's right. The artichoke, also called globe artichoke,  is the flower bud of a type of thistle.  The perennial thistle cultivar that produces artichokes originated in southern Europe and spread throughout the Mediterranean area. The origins of the ancestors of this cultivar are unknown, but it is believed to have been northern Africa.  Arab horticulturists produced the cultivar from the wild species, and is documented in the Mediterranean area as early as the 9th century in Naples.

Artichokes are a very healthy vegetable. They are full of antioxidants, help lower cholesterol and artichoke leaf extract has been shown to reduce the symptoms of  Irritable Bowel Syndrome.

World artichoke production is centered in the Mediterranean area. the main producers are Spain, Italy and France. Almost 100% of commercial artichoke growing done in the United States is done in California, with the town of Castroville, CA.  proclaiming itself as "The Artichoke Center Of The World".

Artichokes are easy to prepare. Pick ones that are green and firm, with very little or no brown color. Trim the ends of the leaves to remove any thorns, and cut the stem so it is about one inch long. Steam them for 20-45 minutes according to size. The larger ones will take longer. Don't cover the steamer when you cook them, as this will allow certain oils to escape and prevent the artichoke from turning brown. Also put a sliced up lemon in the steaming water, a few cloves of crushed garlic, and a bay leaf. This will add flavor and help retain the green color.

To eat a cooked artichoke, remove the leaves one at a time and dip the large end in lemon butter, mayonnaise, or any other dip you prefer. Drag the end of the leaf over your teeth to remove the fleshy end of it, and move on to the next leaf. Once you get the large leaves eaten and are down to the smaller leaves and 'choke', remove all the leaves and scrape out the choke with a spoon.  What you have left is the 'heart' of the choke and is the best part. Cut into pieces, dip and enjoy!

Friday, September 2, 2011

Tomatoes, Tomatoes...They're Everywhere!

In this part of Northern Illinois when the weather gets hot and we get at least a minimum amount of rain, the tomato plants go into full production. With the odd spring we've had (hot, then cold, hot then cold)  the tomatoes took their sweet time producing anything. But with the two plus weeks of high heat and humidity in August, they finally took off.  I've only got three plants, and I picked a bucketful yesterday and in a few days I'll have another bucketful.

So after the initial blush of tomato eating and after your mouth gets sore (literally from the acid in the things) what do you do when they keep producing? There's only so many you can give away.  Well, some folks can them.  That's what my Mother did, and with a family of seven kids it made sense. I remember her canning the darned things, always in the heat of summer in a kitchen with no air conditioning. it's a hot job to say the least.  Or you can break out the food mill and make some tomato sauce. Another hot, nasty job cooking the tomatoes down.  When I make my tomato sauce I don't use a food mill to remove the seeds and skin. I use a Squeezo.


It's a great tool that separates the pulp and juice from the seeds and skin, all with the turn of a handle.  You can freeze or can the pulp and juice as-is and cook it down later, or to save room in the freezer or canning jars you can reduce it down immediately.  I like to add chopped onion, garlic, celery, oregano, salt and pepper and cook it down. I put it up in plastic containers that are about as big as commercial jars of sauce and freeze it. That way it's ready to go when I want to use it for spaghetti or pizza.

You can also freeze tomatoes whole. I like to do this and use them for chili, stew, soup.  It's the easiest way to preserve some of those tasty tomatoes for later in the year.  Before freezing them , the skins need to be removed. All you need for that is a sharp knife, an ice water bath and a boiling water bath.


 First, wash all your tomatoes under cool running water. DON'T CORE THEM, just wash them well. With each tomato, you want to make two cuts in the blossom end (or bottom) of the tomato in the shape of a cross.  Place a deep pan (such as a dutch oven) half filled with water on the stove to boil.  Fill a large bowl half full of ice and water and put it on the counter near the boiling water. When the water is boiling,VERY CAREFULLY lower 3-5 tomatoes at a time into the boiling water with a large spoon or strainer. Leave in the boiling water 15-20 seconds, then lift them out with the large spoon and put them into the ice water bath immediately. The sudden change in temperature will cause the skins to loosen from the tomato and they will easily slip off.

When you get all of the tomatoes peeled, you can then core them and cut the tomatoes in pieces any size you want, or freeze them whole. They'll add a lot of flavor to soups and stews, and be perfect for making a big pot of chili on those cold winter night.


Wednesday, June 29, 2011

Fluffy Omelet

For those times when you'd like something a little different for breakfast, try a fluffy omelet! A fluffy omelet is light and airy, but not as much as a souffle.
  • 6 eggs
  • salt and pepper to taste
  • 1/2 teaspoon garlic powder
  • 1/2 cup finely diced ham, cheese, or both
  • 2 tablespoons oil

Preheat oven to 350 degrees. Separate egg whites from the yolks and put into large bowl, yolks into medium bowl.  Be careful not to get any yolk in the whites.  Beat whites with mixer until light and airy. Add  the rest of the ingredients to the yolks and combine thoroughly. Slowly fold yolk mixture into the whipped whites. Go slow and make sure you mix thoroughly. 

Heat an oven-proof skillet on the stove. I use a #10 cast iron skillet. When the skillet is hot, add 2 tablespoons oil. Pour in egg mixture when oil is hot, and cook until bottom of eggs start to set, about 2-3 minutes. Place skillet in preheated oven and bake. Depending on your oven, this could take 7-10 minutes. The best way to check when the omelet is done is to shake the skillet gently and see if it is set on the top. You can also insert a toothpick in the top and see if there is any uncooked egg on it when you remove it.  After the omelet is cooked, I put it under the broiler for a few seconds to give it a light brown color on the top.

Remove the skillet from the oven, run a blunt knife around the edges of the omelet to loosen and turn it out onto a large plate. Serve with some cinnamon bagels or any other breakfast accompaniment you wish.

Wednesday, June 15, 2011

Snow Peas


Snow peas are an edible pea pod that are a staple of Chinese cooking, and can be found in many produce sections and markets.  Don't confuse them with sugar snap peas. Snow peas are smaller and flatter while sugar snap peas are rounder and fatter.


Peas are perhaps one of the oldest cultivated vegetables, as evidence of peas were found at a stone-age lake village archeology site in Switzerland.  The wild variety of peas are believed to have been native to western Asia and eastern Europe.   Peas weren’t really popular in Europe until after 1600. They were thought to be extravagant and were eaten only by royalty.


With their crisp texture, they are perfect for stir-frying as they take only a minute or two to warm through.  They have a unique flavor, slightly sweet with just a hint of bitterness to the larger pods, especially when eaten raw. They can be added to main dish meals or served as a vegetable side, added to soups or served raw in salads.


They are very high in Vitamins A and C and are loaded with iron and potassium. When shopping for them, select pods that are no longer than 3 inches, that have a good color, are firm and have no dark spots on them. To prepare them for cooking, remove both ends by pinching and wash thoroughly and cook them whole.


If you like to garden, try growing your own.  Snow peas are very easy to grow. They need to be planted early in the spring, before the last spring frost as they grow very well in cooler temperatures. They can even handle frost. Just follow the directions on the seed packet, provide them a fence or lattice to climb, and you'll have a good crop of snow peas as a reward.  Keep the pods picked, and the plants will continue to produce for quite awhile. Snow peas are easy to preserve by freezing. Just prepare them as for cooking, but dry them and spread on a single layer on a cookie sheet and put into the freezer. When frozen, put them in a zip lock bag and store in the freezer.


My Zimbio