Saturday, December 17, 2011

Tea Brined Chicken

First of all, hats off to Lacy and her blog New York City Eats where I first saw this recipe. She's got an impressive blog you need to visit with tons of great recipes.

I've seen chefs on Food Network brining turkey for Thanksgiving but never tried it. People who have, swear by the method as it makes the turkey more flavorful and juicy. I saw this recipe at the above mentioned blog and thought I'd give it a try for myself. Trying it with a chicken is easier than with a big turkey anyway. After making a few changes to the recipe, I found that brining the chicken with tea did make it very juicy and flavorful! So give it a try, either version of the recipe, and I'm sure you'll agree.

Original brine recipe
3 Twinings Lapsang Souchong tea bags
1 quart + 1 cup water
1/3 cup + 2 tablespoons kosher salt
1/4 cup + 1 teaspoon dark brown sugar
(for brining 3-4lb chicken)

My alternative recipe
3 Twinings African Rooibos Red Tea bags
1 1/2 quarts water
1/2 cup pickling salt
1/3 cup brown sugar
(I was brining a 5 pound chicken)

So why the changes? A bigger chicken for one thing, plus I couldn't find the Lapsang Souchong tea locally. I picked the African Red tea just to be different, and I didn't realize until I got home that it is an herbal tea. But sometimes you just have to run with what you've got. I used pickling salt instead of kosher salt because it's what I had. Like I said, run with what you've got...

Whichever recipe you use, bring the water to a boil. Take off  the heat and put in the tea bags. Let steep for 20 minutes, then add salt and sugar. Let mixture cool, then put chicken in a gallon zip-seal bag and pour brine into it. Seal bag, put in a large bowl (just in case it leaks) and refrigerate over night.  Next day, remove chicken from brine, place in a roasting pan and roast in a 375 degree oven until internal temperature reaches 165 degrees.

The chicken comes out of the oven a reddish-brown color and the skin is delicious. I didn't put anything on the chicken when I roasted it and it needed no salt at the table. After it rested for 15 minutes, it was very tasty and juicy. I'll definitely be doing this again using a different kind of tea to see how it affects the flavor.

Wednesday, October 5, 2011

Tuna And Home Made Noodle Casserole

Not just any home made noodles, but noodles that have flax seed meal in them. Flax seed is high in soluble and insoluble fiber, anti-oxidants, and Omega-3 fatty acids. flax seed meal can be found in the supermarkets. If you get some, be sure to store it in an air tight container in the refrigerator. It should be used within two months after opening.

Home made noodles are pretty easy to make, it just takes a little extra time to do it.


Noodles
  • 2 3/4 cup all purpose white flour
  • 1/4 cup flax seed meal
  • 4 eggs
  • 2 TBSP olive oil
  • 2 TBSP cold water
  • 1/2 tsp salt
Put all ingredients into large bowl, mix and knead until loose dough forms. Gather all the dough and press it into a ball shape and knead for a few minutes. Again make the dough into a ball, wrap in plastic wrap and let rest for 30 minutes.  Separate dough into halves, roll each half into a large rectangle, making sure to keep dough well floured.  When dough is the thickness desired (remember that the noodles will get thicker when cooked) start at one end and roll up the dough like a jelly roll. With a sharp knife, cut thin noodles along the whole length of the roll of dough. Noodles will unroll after cutting if enough flour was used. Heat a large pot of water to boiling that has a little salt and olive oil added to it. Cook noodles until tender, about 5 minutes. Check noodles often while cooking as fresh noodles cook faster than dried ones.

Casserole 
  • 1 26-ounce can cream of mushroom condensed soup
  • 3 5-ounce cans tuna packed in water
  • 1 TBSP garlic powder
  • 1 regular sized package frozen peas
  • pepper to taste
  • 1/2 cup cheddar cheese
  • cracker crumbs
In a large sauce pan, combine soup and tuna with all the water it is packed in. Add garlic powder and cook over medium heat until hot.  Add frozen peas and cook a few minutes. Drain noodles thoroughly and put in large bowl. Add soup mixture and combine thoroughly to cover all the noodles. Stir in pepper to taste. Place noodle mixture in a 13 x 9 baking pan. Sprinkle cheese and cracker crumbs on top. Place in a preheated 375 degree oven for 30 minutes or until cheese and cracker crumbs are nicely browned.

Saturday, September 24, 2011

Thai Marinated Baked Salmon

A great recipe to add some flavor into baked salmon, and it's easy to do too!

  • Salmon fillets
  • 4 cloves garlic chopped
  • 3 green onions chopped
  • 1 inch piece fresh ginger chopped
  • small bunch cilantro
  • 1/4 cup soy sauce
  • 1/4 cup olive oil
  • 3 limes, 2 sliced, 1 cut into wedges
  • 3 TBS honey
  • 1 tsp sesame seed oil
  • 1/2 tsp black pepper
  • 3 or 4 dried red chilies (optional)
This marinade needs no salt due to the saltiness of the soy sauce. Put all ingredients except salmon in a bowl and mix thoroughly. Omit hot peppers if you do not want the dish to be hot. Put salmon fillets skin-side down in a roasting pan and pour marinade over. Cover with plastic wrap and allow to marinate in the refrigerator for at least two hours. The longer it marinates the stronger the flavor.

Preheat oven to 425 degrees. Remove fish from marinade and put in a clean roasting pan. Or bake fish in the marinade for a more intense flavor. Bake for 15 minutes, serve with lime wedges.

Tuesday, September 20, 2011

Bundt Cake Neapolitan

A cake that has three different flavors baked into it; vanilla, chocolate and strawberry. Just like Neapolitan ice cream!

  • 1 package (18.25 ounce) yellow cake mix
  • 1 cup water
  • 3 eggs
  • 1/4 cup vegetable oil
  • 1/4 cup chocolate syrup
  • 1 TBS cocoa powder
  • 1/4 cup strawberry jelly
  • 8 drops red food coloring
Add water, eggs, oil and cake mix in large bowl and mix on medium speed for two minutes. After batter is thoroughly mixed, divide it into three equal portions. Use oil spray in a bundt cake pan and pour one of the portions into it. Take one of the other portions and mix in the chocolate sauce and cocoa powder. Carefully spoon this mixture into the cake pan.  Take the last portion and mix in the strawberry jelly and food coloring. Carefully spoon this mixture into the pan. Do not swirl the mixtures together.

Put in a preheated 350 degree oven for 40-45 minutes or until a toothpick inserted into the center comes out clean. When done, let cool in the pan for 10 minutes. Use a thin rubber or plastic spatula (a metal one will scratch the cake pan) and gently run it down each fluted side of the pan to loosen the cake. Place a large bowl over the pan, turn it over and let sit until the cake comes out of the pan.  Dust with powdered sugar or drizzle glaze over the cake:

White Glaze:
  • 1 cup powdered sugar
  • 2 TBS milk
  • 2 TBS softened butter
  • 1/2 tsp vanilla
Combine all ingredients and stir until smooth. Pour over cake as desired.

Tuesday, September 13, 2011

Turkey Brat And Bean Stew

A great meal that is not hard to make and tastes really good. Serve with a salad and Italian bread for a complete meal.

  • 1 TBS olive oil
  • 1 pound turkey bratwurst out of casing
  • 1 medium onion, chopped
  • 2 garlic cloves, chopped
  • 1 rib celery, chopped
  • 2 carrots, sliced
  • 3 (15 1/2 ounce) cans Great Northern Beans
  • 1 (14 1/2 ounce) can fire roasted tomatoes
  • 1 tsp oregano
  • 1 tsp basil
  • 1/2 tsp thyme
  • pepper to taste
  • 2 cups washed and dried fresh spinach or chard
Heat a pot large enough for all the ingredients and add olive oil. When oil becomes hot, add sausage, carrots, onions, celery, garlic and onions. Cook over medium heat until sausage is done, stir to break up sausage into small pieces. Add the rest of the ingredients except spinach. simmer until mixture thickens, stir occasionally. After mixture thickens add spinach and when spinach is cooked through, serve.

Saturday, September 10, 2011

The Artichoke - An Edible Flower Bud

That's right. The artichoke, also called globe artichoke,  is the flower bud of a type of thistle.  The perennial thistle cultivar that produces artichokes originated in southern Europe and spread throughout the Mediterranean area. The origins of the ancestors of this cultivar are unknown, but it is believed to have been northern Africa.  Arab horticulturists produced the cultivar from the wild species, and is documented in the Mediterranean area as early as the 9th century in Naples.

Artichokes are a very healthy vegetable. They are full of antioxidants, help lower cholesterol and artichoke leaf extract has been shown to reduce the symptoms of  Irritable Bowel Syndrome.

World artichoke production is centered in the Mediterranean area. the main producers are Spain, Italy and France. Almost 100% of commercial artichoke growing done in the United States is done in California, with the town of Castroville, CA.  proclaiming itself as "The Artichoke Center Of The World".

Artichokes are easy to prepare. Pick ones that are green and firm, with very little or no brown color. Trim the ends of the leaves to remove any thorns, and cut the stem so it is about one inch long. Steam them for 20-45 minutes according to size. The larger ones will take longer. Don't cover the steamer when you cook them, as this will allow certain oils to escape and prevent the artichoke from turning brown. Also put a sliced up lemon in the steaming water, a few cloves of crushed garlic, and a bay leaf. This will add flavor and help retain the green color.

To eat a cooked artichoke, remove the leaves one at a time and dip the large end in lemon butter, mayonnaise, or any other dip you prefer. Drag the end of the leaf over your teeth to remove the fleshy end of it, and move on to the next leaf. Once you get the large leaves eaten and are down to the smaller leaves and 'choke', remove all the leaves and scrape out the choke with a spoon.  What you have left is the 'heart' of the choke and is the best part. Cut into pieces, dip and enjoy!

Friday, September 2, 2011

Tomatoes, Tomatoes...They're Everywhere!

In this part of Northern Illinois when the weather gets hot and we get at least a minimum amount of rain, the tomato plants go into full production. With the odd spring we've had (hot, then cold, hot then cold)  the tomatoes took their sweet time producing anything. But with the two plus weeks of high heat and humidity in August, they finally took off.  I've only got three plants, and I picked a bucketful yesterday and in a few days I'll have another bucketful.

So after the initial blush of tomato eating and after your mouth gets sore (literally from the acid in the things) what do you do when they keep producing? There's only so many you can give away.  Well, some folks can them.  That's what my Mother did, and with a family of seven kids it made sense. I remember her canning the darned things, always in the heat of summer in a kitchen with no air conditioning. it's a hot job to say the least.  Or you can break out the food mill and make some tomato sauce. Another hot, nasty job cooking the tomatoes down.  When I make my tomato sauce I don't use a food mill to remove the seeds and skin. I use a Squeezo.


It's a great tool that separates the pulp and juice from the seeds and skin, all with the turn of a handle.  You can freeze or can the pulp and juice as-is and cook it down later, or to save room in the freezer or canning jars you can reduce it down immediately.  I like to add chopped onion, garlic, celery, oregano, salt and pepper and cook it down. I put it up in plastic containers that are about as big as commercial jars of sauce and freeze it. That way it's ready to go when I want to use it for spaghetti or pizza.

You can also freeze tomatoes whole. I like to do this and use them for chili, stew, soup.  It's the easiest way to preserve some of those tasty tomatoes for later in the year.  Before freezing them , the skins need to be removed. All you need for that is a sharp knife, an ice water bath and a boiling water bath.


 First, wash all your tomatoes under cool running water. DON'T CORE THEM, just wash them well. With each tomato, you want to make two cuts in the blossom end (or bottom) of the tomato in the shape of a cross.  Place a deep pan (such as a dutch oven) half filled with water on the stove to boil.  Fill a large bowl half full of ice and water and put it on the counter near the boiling water. When the water is boiling,VERY CAREFULLY lower 3-5 tomatoes at a time into the boiling water with a large spoon or strainer. Leave in the boiling water 15-20 seconds, then lift them out with the large spoon and put them into the ice water bath immediately. The sudden change in temperature will cause the skins to loosen from the tomato and they will easily slip off.

When you get all of the tomatoes peeled, you can then core them and cut the tomatoes in pieces any size you want, or freeze them whole. They'll add a lot of flavor to soups and stews, and be perfect for making a big pot of chili on those cold winter night.


Wednesday, June 29, 2011

Fluffy Omelet

For those times when you'd like something a little different for breakfast, try a fluffy omelet! A fluffy omelet is light and airy, but not as much as a souffle.
  • 6 eggs
  • salt and pepper to taste
  • 1/2 teaspoon garlic powder
  • 1/2 cup finely diced ham, cheese, or both
  • 2 tablespoons oil

Preheat oven to 350 degrees. Separate egg whites from the yolks and put into large bowl, yolks into medium bowl.  Be careful not to get any yolk in the whites.  Beat whites with mixer until light and airy. Add  the rest of the ingredients to the yolks and combine thoroughly. Slowly fold yolk mixture into the whipped whites. Go slow and make sure you mix thoroughly. 

Heat an oven-proof skillet on the stove. I use a #10 cast iron skillet. When the skillet is hot, add 2 tablespoons oil. Pour in egg mixture when oil is hot, and cook until bottom of eggs start to set, about 2-3 minutes. Place skillet in preheated oven and bake. Depending on your oven, this could take 7-10 minutes. The best way to check when the omelet is done is to shake the skillet gently and see if it is set on the top. You can also insert a toothpick in the top and see if there is any uncooked egg on it when you remove it.  After the omelet is cooked, I put it under the broiler for a few seconds to give it a light brown color on the top.

Remove the skillet from the oven, run a blunt knife around the edges of the omelet to loosen and turn it out onto a large plate. Serve with some cinnamon bagels or any other breakfast accompaniment you wish.

Wednesday, June 15, 2011

Snow Peas


Snow peas are an edible pea pod that are a staple of Chinese cooking, and can be found in many produce sections and markets.  Don't confuse them with sugar snap peas. Snow peas are smaller and flatter while sugar snap peas are rounder and fatter.


Peas are perhaps one of the oldest cultivated vegetables, as evidence of peas were found at a stone-age lake village archeology site in Switzerland.  The wild variety of peas are believed to have been native to western Asia and eastern Europe.   Peas weren’t really popular in Europe until after 1600. They were thought to be extravagant and were eaten only by royalty.


With their crisp texture, they are perfect for stir-frying as they take only a minute or two to warm through.  They have a unique flavor, slightly sweet with just a hint of bitterness to the larger pods, especially when eaten raw. They can be added to main dish meals or served as a vegetable side, added to soups or served raw in salads.


They are very high in Vitamins A and C and are loaded with iron and potassium. When shopping for them, select pods that are no longer than 3 inches, that have a good color, are firm and have no dark spots on them. To prepare them for cooking, remove both ends by pinching and wash thoroughly and cook them whole.


If you like to garden, try growing your own.  Snow peas are very easy to grow. They need to be planted early in the spring, before the last spring frost as they grow very well in cooler temperatures. They can even handle frost. Just follow the directions on the seed packet, provide them a fence or lattice to climb, and you'll have a good crop of snow peas as a reward.  Keep the pods picked, and the plants will continue to produce for quite awhile. Snow peas are easy to preserve by freezing. Just prepare them as for cooking, but dry them and spread on a single layer on a cookie sheet and put into the freezer. When frozen, put them in a zip lock bag and store in the freezer.


Friday, June 10, 2011

Asian Food Condiments And Sauces

The practice and art of cooking in the orient utilizes a variety of combinations, textures, flavors, colors and techniques. A large part of this style of cooking has to do with sauces and condiments that are used for cooking and at the table. What follows is a short list of the more common items:

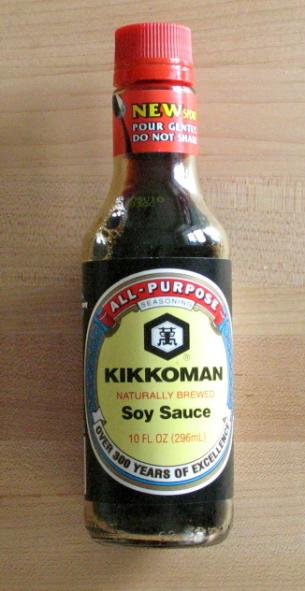
Soy Sauce - Soy sauce originated in China around 3,000 years ago. Basic soy sauce is made by fermenting soy beans with water, salt, and specific types of molds. Sometimes other substances like wheat are added.  There are many different varieties of soy sauce. Every country and region seems to have their own variation on the basic sauce. But all soy sauces are brown, salty,  and earthy.  They can be added to stir fries, soups, and can be used as a marinade.  Soy sauce has been incorporated into more western types of recipes as an ingredient in barbecue sauces and other uses.  Standard soy sauce is very salty,  and contains over 900 milligrams of sodium per tablespoon. It can be a problem for those who need to restrict their sodium intake. There is a low sodium soy sauce that cuts the sodium per tablespoon by roughly 30%.   Whatever type of soy sauce, use sparingly until you become more familiar with it as it can overwhelm a dish if overused.

Sweet and Sour Sauce -  A mainstay of Cantonese cooking. It  can be used to cook with or for a dipping sauce. As with soy sauce, there are many different versions of this sauce but the basic sauce is made with vinegar and honey or sugar.  This sauce can be bought ready made in most grocery stores, but it is quite easy to make at home.


Hoisin SauceThis is  a dipping sauce and is also used as Chinese barbecue sauce.  It has a very salty and sweet flavor.  It can be used in stir-fry recipes as a thickener as well as for its flavor.

Plum SauceA thick sauce similar to Hoisin and used in the same ways. It is tangy, sweet and spicy and is often made with vinegar, sugar, chili peppers and plums.  Some Plum Sauces have a slightly smoky flavor to them.

Oyster Flavored Sauce The original of this sauce was made by cooking down oysters and adding salt to the mixture. The modern version is made with oyster extract, caramel for color and thickened with corn starch. It is very thick, salty and savory, a perfect sauce for adding to beef or pork.  If used with chicken it can overwhelm the chicken flavor.   A dollop added to a stir-fry can really add a lot of flavor to the dish.

Duck SauceA type of sweet and sour sauce usually made from apples, but can also be made from plums, apricots, or peaches. Salt, vinegar , chili peppers and ginger are also added. It is usually very thick and translucent with an orange color.  This is used primarily for a dipping sauce and is very sweet, tart and fruity.

Rice Wine VinegarThis is a vinegar made from rice wine. It can be clear or various shades of red and brown. It is not as acidic as Western vinegar and it has a slightly sweet taste, so when a recipe calls for rice wine vinegar, do not substitute regular vinegar. It is used as an ingredient in many of the sauces previously mentioned, as well as for cooking and for dipping.

Sesame OilSesame oil is extracted from sesame seeds, and is used in South India as a cooking oil.  In Chinese and other cuisines it is used as a flavoring agent.  Regular sesame seed oil is amber in color and has a  nutty flavor. Dark sesame seed oil is made from tasted sesame seeds and is darker and has a stronger flavor.  All sesame oils have a robust flavor, so only a few drops can flavor a pot of soup or stir -fry. Use too much, and it can easily overwhelm the dish. Always add sesame oil towards the end of the cooking process. If it gets too hot and burns the flavor is ruined. 

Sriracha Sauce - A chili sauce made from jalapenos, salt, sugar, garlic and vinegar. The original Sriracha sauce of Thailand is different than the more common Sriracha found in most markets in the United States. Also known as rooster sauce because of the rooster on the bottle, this sauce is known around the world and is made in the United States by immigrants from Thailand. this is without a doubt my favorite chili sauce of all. It is a tad bit sweeter and not as acidic as Tabasco,  and goes good with eggs, stir-fry, almost anything.  When cooking with Sriracha, some of the heat is lost but the flavor remains. It is great stir-fried with shrimp or chicken.

Wednesday, June 8, 2011

Pickled Cucumber Salad

A light and simple salad that is very refreshing on a hot summer's day. A great way to use up  those cucumbers from the garden!

  • 3 medium sized cucumbers
  • 2 carrots
  • 1 medium onion
  • 1 clove garlic
  • 1/4 teaspoon dill weed
  • red wine vinegar
  • olive oil
  • salt and pepper to taste
Peel cucumbers. Slice thinly with a knife, or a mandolin. Peel carrots, and slice thinly. Slice onion into thin rings.  Peel and finely dice garlic and put into glass bowl that has a lid.  Add some salt to the garlic and blend together with a fork while pressing mixture to the sides and bottom of the bowl. Add cucumbers, carrots, onions and dill.  Add  3 tablespoons of red wine vinegar and 6 tablespoons of olive oil. Blend together with vegetables and add salt and pepper to taste.  Add more vinegar if desired, and always add twice as much olive oil as vinegar.  Cover and refrigerate until chilled.

Rice wine vinegar or apple cider vinegar can be substituted for red wine vinegar. Each one has its own flavor. Other raw vegetables can be added such as green peppers, celery, etc.  If you find that this salad is too sour for your taste, add a teaspoon of sugar to it to cut the acidity.

Tuesday, June 7, 2011

Sweet Peppers - History And Facts

Sweet peppers originated in South America and Mexico. Evidence of them dates as far  back as 5000 BCE. Some facts and history about the Jalapeno pepper's mild cousin:
  • Sweet peppers are in the same family as eggplant, potatoes, tomatoes, and deadly nightshade, a toxic plant. 
  • The first explorers of South America were from Portugal and Spain, and they carried sweet peppers to their native lands and around the world. 
  • The most common type of sweet pepper are bell peppers, so named because of their bell-like shape. They all can be eaten green, or for a sweeter taste they can be allowed to ripen.  Depending on the variety, fully ripened bell peppers can be red, yellow, brown, black, or orange.
  • The other type of sweet peppers come in a variety of colors and are shaped more like a banana.  
  • Bell peppers are not hot, even if you plant a bell pepper next to a hot pepper plant, the bell pepper will not cross with the hot pepper. But banana peppers can cross with hot peppers if the plants are too close together. 
  • Sweet peppers are very high in Vitamins C and A. These two antioxidants work together to break up free radicals which cause damage to cells.  Including sweet peppers in your diet can help prevent or reduce asthma symptoms, arthritis, diabetes-caused nerve damage, and other ailments. 
  • Peppers were named by Christopher Columbus, namely the hot varieties because they reminded Columbus of the heat of black peppercorns.

Wednesday, June 1, 2011

Chicken Salad

Who doesn't like a chicken salad sandwich for lunch on a hot summer's day, or any other day for that matter! The key to making good chicken salad is to begin imparting flavor all the way through the making of it.  My recipe is just as much about method of cooking as ingredients:

  • Split chicken breasts with skin, on the bone
  • 2 celery stalks, one halved the other diced
  • 1 medium onion, quartered
  • 6 small carrots
  • 1 clove garlic or garlic powder
  • 4 green onions, chopped
  • 1/2 small dill pickle finely diced
  • 1 small bunch grapes cut in half
  • 1 small apple, roughly chopped
  • 1/2 cup chopped walnuts
  • mayonnaise or Miracle Whip salad dressing
  • salt and pepper to taste
Place chicken breasts, carrots, one stalk of celery, 1 clove garlic or sprinkle of garlic powder, and onion in stock pot. Cover with water and simmer until chicken is completely cooked.  Take out chicken breasts and place them in a large bowl of ice water to stop the cooking process.  When breasts have cooled, take the skin off  the meat and de-bone.


Place apple,  diced celery, halved grapes chopped green onions, pickle and walnuts in a bowl.   Rough chop three or four of the chicken breasts and add. Use enough mayonnaise or salad dressing to make the salad the consistency you want, add salt and pepper to taste.

This salad goes well with most any kind of bread that has some body to it. A home made whole wheat bread or crusty french bread is ideal.  The cooking method of simmering in a pot with vegetables not only gives great flavor to the chicken, but it also gives the added bonus of the water the chicken was cooked in, which of course has been transformed into chicken broth!  Strain it and use it to make chicken soup or stew.

Tuesday, February 15, 2011

Mushrooms - Plants Or Animals?

All mushrooms belong to the family of fungi, which is neither plant or animal. After continuing research there is evidence that fungi may be more closely related to animals than plants. The fungi family includes over 200,000 identified species with possibly hundreds of thousands more that have not been identified. From the tiniest microfungi such as bread mold and yeast to what is believed to be the largest living thing on earth, a Honey Mushroom that lives in the Blue Mountains of eastern Oregon that is estimated to cover over 2,200 acres and be at least 2,400 years old, the earth teems with fungi! There are many varieties used for cooking, from the common and inexpensive button mushroom to the very expensive (thousands of dollars a pound) for white truffles.

The most widely cultivated, harvested and purchased mushroom in the world is the white or button mushroom. It is low in Saturated Fat and Sodium, and very low in Cholesterol and a good source of Dietary Fiber, Protein, Vitamin C, Folate, Iron, Zinc and Manganese, and a good source of Vitamin D and many other nutrients and vitamins.

Button mushroom flavor is mild, and they tend to take on the flavor of  foods they are cooked with. They are easy to use either whole or sliced. There is a school of thought that since these mushrooms tend to absorb liquids that they should not be washed, but gently brushed off before cooking. Personally, I see no harm in washing mushrooms especially when it is remembered that they are grown in horse manure (albeit sterilized and composted). As long as they are rinsed and dried without allowing them to soak in water, there should be no problem.

The next most widely used mushroom is the Crimini, or Italian Brown mushroom.  When these mushroom grow larger they are called Portabella mushrooms.  They are actually the original mushroom that the button mushroom was derived from. The white color was developed because it was thought to be more eye-appealing. Crimini mushrooms tend to be a little more dense in texture and have a deeper flavor than button mushrooms. 

There are some basic guidelines to using these mushrooms and many other mushrooms.  If you are using them fresh, do not wash them or slice them until ready to incorporate them into the dish. If you are using canned mushrooms, be sure to drain them well.  If you are pan-frying them by themselves they will tend to soak up some of the oil so be sure to add a little more when needed. The difference in taste between mushrooms browned and caramelized with oil and/or butter and those that don't get caramelized and brown is like night and day.  Potabella caps can be pan-fried and used and eaten as a hamburger with all the trimmings for a veggie burger. They can also be stuffed with a variety of stuffings. 

There are many other varieties of mushrooms, fresh and canned, available in supermarkets. But these two basic kinds of mushrooms can take you a long way into learning how to use and appreciate this very unique, versatile and nutritious fungi.

Tuesday, February 8, 2011

Chocolate Coffee Cookies

Photo by Josh Goodwin
A flour-free, light and crispy cookie that's easy to make. Be sure to store them in an air-tight container so they stay fresh longer.

  • 3 egg whites
  • 1 cup sugar
  • 1/4 teaspoon salt
  • 1/4 teaspoon cream of tartar*
  • 3 TBSP cocoa powder
  • 1 TBSP instant coffee
  • 3 TBSP mini chocolate chips

Preheat oven to 300 degrees

Separate three eggs, put whites in large bowl. Add cream of tartar and salt, whip with mixer until soft peaks form. Slowly add sugar a tablespoon at a time, whip until firm peaks form.  Sift coffee and cocoa powder into egg white mixture and fold in. Add mini chocolate chips and fold in.

Put parchment paper on a cookie sheet, and drop tablespoonfuls of the mixture onto the paper, or fill a pastry bag and pipe approximately a tablespoon of the mixture onto the paper.  Bake for 40 minutes or until cookies get crispy.

Place on rack and allow to cool completely. 

*Cream of tartar, or potassium bitartrate, is a natural occurring crystal that forms during the fermentation of grape juice in making wine and can also form behind the cork of wine already bottled. The crystals also will form in grape juice that is chilled.  These crystals are collected and purified to be used in many culinary applications.  It is used with egg whites to help stabilize the whites, make them more heat tolerant and maintain a greater volume when they are whipped.

Saturday, January 22, 2011

Oven Baked Chicken Parmesan

Chicken Parmesan is usually pan fried, loaded with cheese and a thick coating of bread crumbs. Use this recipe and bake it in the oven and save on calories and fat!
  • 4 skinless boneless chicken breast halves
  • Panko bread crumbs
  • 1/2 tsp Italian seasoning
  • salt and pepper
  • 2 eggs
  • tomato sauce 
  • 8 ounces mozzarella cheese, grated
  • 2 ounces parmesan cheese, grated
Preheat oven to 400 degrees.

Lay chicken breast on cutting board, cover with plastic wrap and pound the breast out until it is about 1/4 of an inch thick all the way around.

Combine Panko bread crumbs, Parmesan, and Italian seasoning on a large plate. Beat two eggs until they become smooth. Salt and pepper chicken breasts, put into the egg mixture and then into the bread crumbs. Press bread crumbs onto chicken breast to make sure they stick.  Place breaded breasts onto a large cookie sheet and put into preheated oven.  Bake for 15 minutes or until bread crumbs begin to brown. Add a spoonful of tomato sauce and 2 ounces of mozzarella to each breast and bake until cheese is nicely melted. Serve with a tossed salad and a side of Risotto.
My Zimbio